1. Description
This document describes the use of an App Inventor 2 (AI2) extension to be able to communicate via Classic Bluetooth an App developed with AI2 with any device. Associated with this extension, an Arduino code is included to be able to encode and decode the Bluetooth telegrams (see Protocol section).
The extension includes AI2 components to access different types of generic electronics such as digital, analog, and PWM inputs and outputs, but also for fairly common Arduino devices such as the sound buzzer, temperature and humidity sensors, infrared, etc… each These devices have an AI2 component with specific functionalities.
In addition, there are also components for access to variables, not necessarily associated with a certain type of electronics, on which we can share information between the App and the device. These variables can be of the type boolean (bool), integer (int), decimal (float) and text strings (String).
The extension was first developed by Leopoldo Armesto for Robótica Fácil, source code of the original extension can be found at [1], while the source code of the new extension has been integrated within Facilino OTA repository [2]. During the development of EcoThings project we have updated and improved this extension. For obvious reasons, we have kept the namespaces of Java classes as they were, I.e.: using Robótica Fácil names.
a. Download
The latest version of the Bluetooth extension can be downloaded from:
https://facilino.webs.upv.es/ai2/es.roboticafacil.facilino.runtime.bluetooth.aix
While the latest version of the Web extension can be downloaded from:
https://facilino.webs.upv.es/ai2/es.roboticafacil.facilino.runtime.web.aix
b. Importing Extensions in AI2
Once downloaded, you can import the extension to your project from the designer view:

a. AI2 Project
This AI2 project is used as a complete demonstration of the capabilities of using AI2 to remotely read values from a Multisensor shield using an ESP32 and also to set values for actuators such as a servo, or LEDs.
The project can be downloaded from:
https://facilino.webs.upv.es/ai2/FacilinoBluetooth_demo.aia
The project has the following visible components:
| Name | Component Type | Description |
| DeviceMAC | Label | To show the MAC of the device once connected. |
| Connect | ListPicker | To select the device to connect to. |
| Disconnect | Button | To disconnect from a device. |
| BlueLed | Switch | To set the blue LED state. |
| LblServoAngle | Label | To show the numerical value of the angle sent to the servo. |
| ServoSlider | Slider | To set the angle of the servo. |
| ReadSwitch | Switch | To enable/disable readings of sensors. |
| ImgButD2 | Image | An image to show the state of button D2 (ON/OFF). |
| ImgButD3 | Image | An image to show the state of button D3 (ON/OFF). |
| LblPot | Label | To show the numerical value of the potentiometer. |
| PotSlider | Slider | To show the value of the potentiometer on a slider (thumb is not enabled) |
| LblTemp | Label | To show the numerical value of the temperature sensor. |
| TempWarning | Image | To show temperature warnings (too hot or too cold based on the threshold values). |
In addition to this, the project has the following non-visible components:
| Name | Component Type | Description |
| Clock1 | Clock | Used to send read requests for sensors (buttons and potentiometer) periodically. |
| ClockTemperature | Button | Used to send read requests for temperature sensor DHT11 (it has a different sampling period and thus, we use a separate clock). |
| FacilinoBluetoothClient1 | FacilinoBluetoothClient | The Bluetooth client in charge of send and receiving all requests. |
| D13LED | DigitalWriteBluetooth | Bluetooth component to control the blue LED connected to D13 (GPIO18). |
| D12LED | DigitalWriteBluetooth | Bluetooth component to control the red LED connected to D12 (GPIO19). |
| D2Bt | DigitalReadBluetooth | Bluetooth component to read button state connected to D2 (GPIO26). |
| D3Bt | DigitalReadBluetooth | Bluetooth component to read button state connected to D3 (GPIO 25). |
| A0Pot | AnalogReadBluetooth | Bluetooth component to read a potentiometer connected to A0 (GPIO2). |
| Servo | ServoBluetooth | Bluetooth component to control a servo connected to D8 (GPIO12). |
| Temperature | TemperatureBluetooth | Bluetooth component to read temperature and humidity for a DHT11 sensor connected to D4 (GPI17) |

The code to stablish the Bluetooth connection is as follows:

To set values for actuators (LEDs and servo), we can use this code:

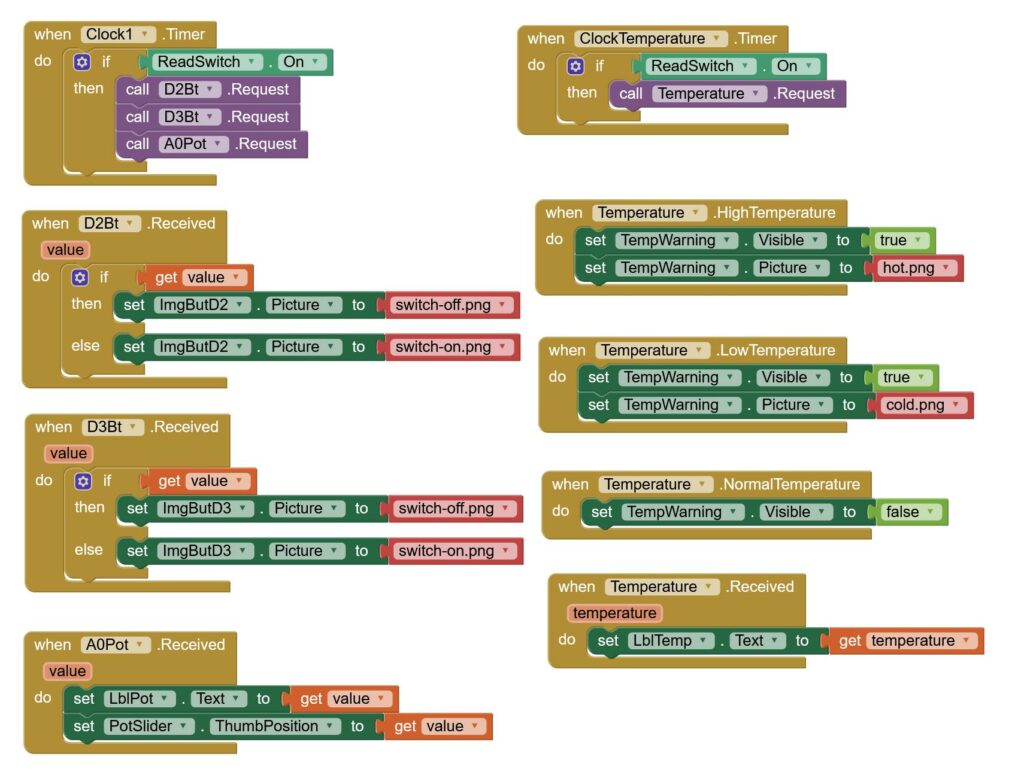
While in order to read from sensors, we can use this code:

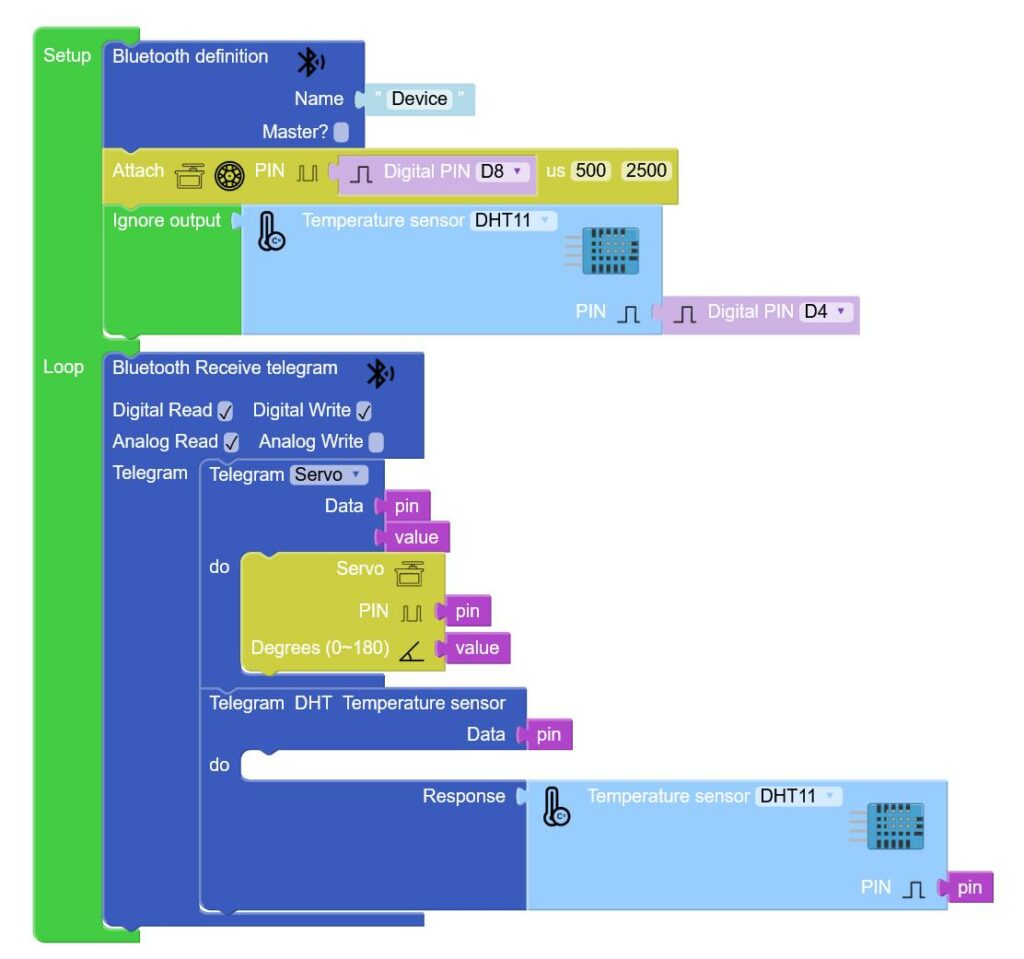
The Facilino code needed to be able to process all requests is as follows:

As it can be seen, digital read and write requests as well as analog read requests are being handled by the Bluetooth Receive telegram instruction which means that all this can of request do not require any extra block instructions. In order to control a servo, we need first to attach the servo, by using the servo attach instruction, we are indicating to Facilino that we will use this servo. Similarly, by performing a first temperature read with DTH11 sensor, we are indicating to Facilino that this sensor will be used and where is connected to. Thus, Facilino uses that information to decode a Servo telegram to set the angle to the corresponding servo pin and also to decode a Temperature telegram to read from the corresponding DHT11 sensor.
a. AI2 Project
This demo uses the web extension and has basically the same visible components are the Bluetooth demo, but the connection-related components, in which we have to indicate the IP of the device to send data.
The project can be download from:
https://facilino.webs.upv.es/ai2/FacilinoWeb_demo.aia
Thus, the following visible components are the main ones:
| Name | Component Type | Description |
| IP | TextBox | User must introduce the device IP (i.e.: format as 192.168.1.100) |
| Update | Button | To update device IP |
| BlueLed | Switch | To set the blue LED state. |
| LblServoAngle | Label | To show the numerical value of the angle sent to the servo. |
| ServoSlider | Slider | To set the angle of the servo. |
| ReadSwitch | Switch | To enable/disable readings of sensors. |
| ImgButD2 | Image | An image to show the state of button D2 (ON/OFF). |
| ImgButD3 | Image | An image to show the state of button D3 (ON/OFF). |
| LblPot | Label | To show the numerical value of the potentiometer. |
| PotSlider | Slider | To show the value of the potentiometer on a slider (thumb is not enabled) |
| LblTemp | Label | To show the numerical value of the temperature sensor. |
| TempWarning | Image | To show temperature warnings (too hot or too cold based on the threshold values). |
In addition to this, the project has the following non-visible components:
| Name | Component Type | Description |
| Clock1 | Clock | Used to send read requests for sensors (buttons and potentiometer) periodically. |
| ClockTemperature | Button | Used to send read requests for temperature sensor DHT11 (it has a different sampling period and thus, we use a separate clock). |
| FacilinoWeb1 | FacilinoWeb | The web component in charge of send and receiving all requests (HTTP API). |
| D13LED | DigitalWriteWeb | Web component to control the blue LED connected to D13 (GPIO18). |
| D12LED | DigitalWriteWeb | Web component to control the red LED connected to D12 (GPIO19). |
| D2Bt | DigitalReadWeb | Web component to read button state connected to D2 (GPIO26). |
| D3Bt | DigitalReadWeb | Web component to read button state connected to D3 (GPIO 25). |
| A0Pot | AnalogReadWeb | Web component to read a potentiometer connected to A0 (GPIO2). |
| Servo | ServoWeb | Web component to control a servo connected to D8 (GPIO12). |
| Temperature | TemperatureWeb | Web component to read temperature and humidity for a DHT11 sensor connected to D4 (GPI17) |

The code to update device IP is simply (the web component includes a property named ‘Host’ that can be set at design phase, but also in run-time):

To set values for the actuators, we can use the following code:

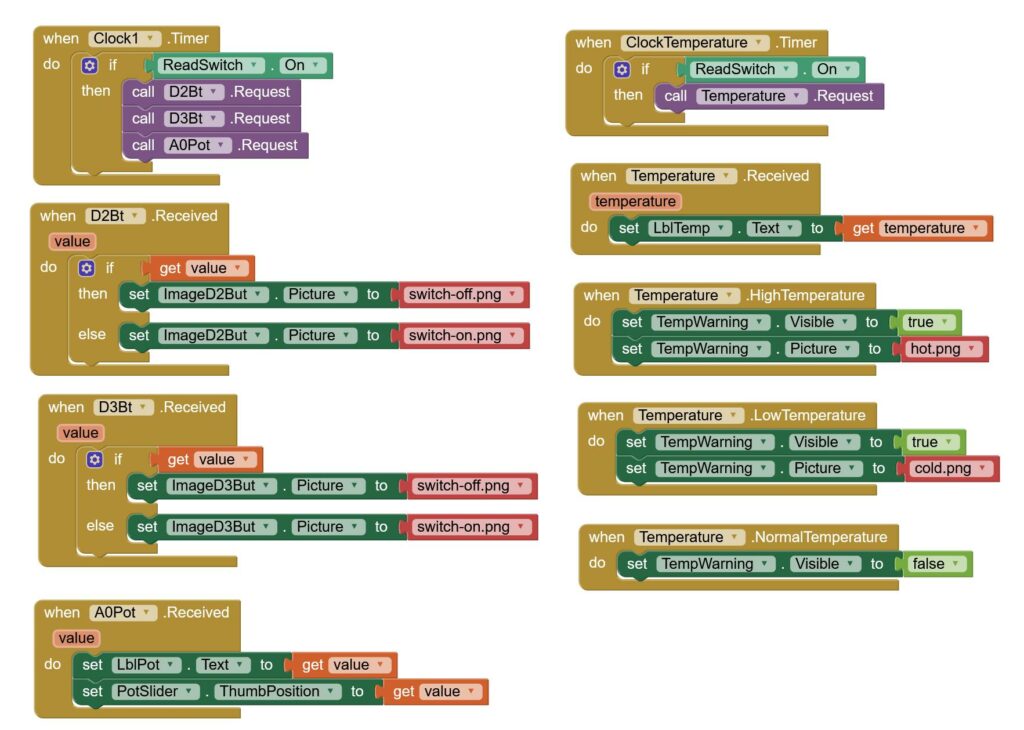
To read from sensors, we can use the following code:

As it can be seen, the code is almost identical in both cases, because of the aspect of the blocks, but the do implement a different feature depending on whether we are using the Bluetooth extension or the web extension.
The Facilino code to deal with HTTP REST request is as follows:

